Related Posts Plugin for WordPress, Blogger...

Entries in recipe (37)

Monday
Aug292011

Hungry Sam: Hurricane Mode! Or, Lemon Chicken a l'Irene

If you hadn't heard, DC was being punished for its sins this last week. Earthquakes, flooding, hurricanes -- all pretty mild, actually, at least here in Washington. I guess our sins can't be that bad.

During the worst of the hurricane on Saturday night, I didn't even lose power -- so obviously I decided to roast a mid-hurricane chicken.

I used a four pound chicken I'd thawed over two days in the fridge. I started by spatchcocking the bird (butterflying; for more here's my post: "Spatchcocked Chicken...heehee") and arranging it skin side up on a foil-covered tray. Then, I melted about two tablespoons of butter and painted the skin before massaging thyme, sage, and salt and pepper in as well. I cut four sprigs off my poor, sad rosemary plant and tucked them under joints, and finished preparing the chicken by arranging wheel of sliced lemon on top.

Click to read more ...

Friday
Aug122011

Key Lime Pie: The Easiest Pie Ever


I even kind of made it look pretty.
Ok. Unless you're a masochist who enjoys spending several years squeezing tiny little Key limes, this pie is definitely the easiest pie, and perhaps the easiest dessert, evah. Which is how we like to say "ever" whenever we're excited the Red Sox decided NOT to spend July and August dropping to the bottom of the AL East! But I digress.
There are FOUR ingredients, and one of them comes with the dish for baking:
-Key Lime Juice (You can spend 14 hours squeezing 'em, or it comes in a bottle)
-Sweetened Condensed Milk (you can own a cow, or it comes in a 14 oz. can)
-Egg yolks (comes in an...egg)
-A graham crust (you can make it, or it comes in a pie tin)


Note my awesome super old hand mixer.
If you want to make it look pretty like I did, then you also need:
-One blackberry
-Half a lime
See? So easy.
Important detail: You can't just use regular lime juice. Key limes are significantly tarter and possess a greater depth of flavor -- they almost taste more like a wicked tart berry than a citrus. They're very, very small, about an inch in diameter, and you can sometimes find them in small sacks in the produce section. Each lime contains only a scant amount of juice; however, my Grammy turned me on to Kellie and Joe's Famous Key West Lime Juice and I haven't looked back since. I've seen it sold everywhere form a standard supermarket to the neighborhood bodega, so look around.
Actually making the pie is simple. Preheat your oven to 350 degrees. Using an electric beater (mine's from like 1976, if you can't tell) or a whisk, or a fork (but come on, spring for a whisk), beat together three egg yolks, the milk, and 1/2 cup of the juice. Then, pour it into the crust. BAM. That's it. If you don't know how to separate egg yolks from their whites, here's a helpful video explanation
 
Now if you want to be fancy (happy, Dawn and Rachel?), paint the exposed edges of the crust with the egg whites you've separated out -- it gives the crust a nice sheen and will help prevent it from breaking into crumbs when you try to cut the final product.


That's an el cheapo silicon brush, but fingers work too!


Throw the pie in for 15 minutes. Don't worry if it seems a tad loose when it comes out; it's set in about another ten minutes on the counter. Here's the pie BEFORE being topped with fruit:


Finally, if you're decorating, thinly slice a halved lime and arrange on the pie. I threw a blackberry into the center, because we had some and I like blackberries, which is the reasoning that guides many of my cooking decisions.


I think it's best to let it cool fully and to refrigerate the pie before serving, but that's your journey. The pie keeps reasonably well for maybe five or six days in the fridge.


Sunday
Jun262011

Coffee + Steak = COFFEESTEAK

These are a few of my favorite things...
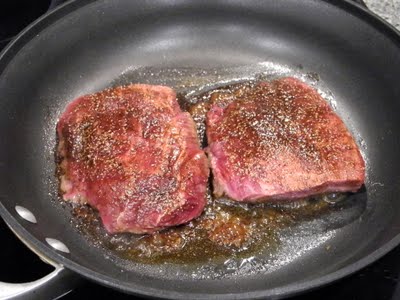
No, I'm NOT just listing two of my favorite things. With the inspiration of (inevitably) Everyday Food Magazine, I endeavored the other night to create an coffee, chile, brown sugar and cinnamon rub, which I used on a good-sized skirt steak before pan-frying.

Martha Stewart's EDF minions suggested a three-ish to one ancho-chile powder to instant espresso powder ration, but I decided to reverse that and reduce the brown sugar, while upping the cinnamon. There was eyeballing involved, but if I had to pretend I remember the recipe, the rub worked out to:

-4 tbsp. instant espresso powder
-2 tsp. ancho chili powder (next time I might experiment with chipotle)
-4 tbsp. granulated brown sugar
-1 tsp cinnamon
-1/2 tsp. black pepper

Mix all the ingredients well (whisk is good, or covering and shaking works too).

I brought the skirt steak to about room temperature so they'd cook evenly. I cut it in two, the better to fit in my 13" skillet, and massaged handfuls of the rub deeply into the beef (both sides). I would have used more of the mixture, but even using significantly less chile powder, I was concerned about the heat.


Now, I've recently taken to pan-frying steaks, since our grill is currently a no-go and I don't think my George Forman grill gets quite hot enough for the seared exterior, rare interior effect I like my steaks to have. I've yet to spring for a good grill pan or some such, so in-the-pan it is.

First, I preheated my oven to 225 degrees. I heated a little butter (enough to coat, but not pool in) the bottom of the pan and brought it to a strong medium-high. The steaks went in, about 2 minutes a side, until well-seared, then I popped the pan into the oven for about 5 minutes to finish cooking to rare. Were my steaks any thinner, I might have skipped this step entirely.


When I finished, I pulled the steaks to my cutting board, cover them loosely with tin foil, and let them sit. ALWAYS let meat sit for a few minutes. Why? I don't know. Some people say it's about letting the juices redistribute themselves evenly throughout; others claim it's about letting the meat fibers reabsorb juices. I don't care which one it is, but after I finish cooking a steak I tent it loosely with foil and let it rest for five minutes.

Verdict: I'd cooked the steak slightly longer than I intended so it reached more of a medium rare than rare, but the flavor was fantastic. Rich and spicy and hearty, slightly sweet and dark, the steaks tasted like the sensation of being in front of a woodfire on a cold day. Delicious, but also just kind of unexpected; I can't say as I've had beef with these flavors before.

Awwww yeah. Here she is:

I ate the steak with sweet corn (microwaving about 2 minutes is the simplest and easiest way to do it) and strawberries, the light sweetness of both cutting through the earthy complexity of the meat.


All around, this rub is a keeper. I might try it mixed into ground beef for burgers -- the surprise intensity would be a fun dish to serve at a barbecue or party. Try it yourself, and tweak the spices -- just use good, rich spices with great depth of flavor.

Monday
Apr042011

The Great Granola Caper of 2011

EPIC AND DELICIOUS GRANOLA.
Well, I like to think that I gained delicious granola, rather than losing delicious granola BARS. Yes, I failed at granola bars, hard.

But I made epic vanilla granola.

Also, I shall name my vanilla granola concoction: "GRANILLA." Sweet.

This afternoon, I visited Whole Foods and played "Bulk Foods Aisle Master Challenge," which is where you attempt to create complex meals using primarily and as many ingredients from the bulk foods section as possible. I opted to make granola bars using every item that could reasonably or conceivable be included, including:

  • rolled oats
  • flax seed
  • pumpkin seeds
  • sunflower seeds
  • bran
  • coconut
  • pecans
  • almonds
  • walnuts
  • craisins
  • dried mango
  • banana chips
  • raisins
  • dried figs
And...I eyeballed ALL the quantities. Mostly small handfuls of everything, except for the oats (I bought about 2 1/2 c. of regular rolled oats -- not quick cook).

The tab? $5.34. Why buy granola? Ever? Yeesh.
The root of my granola BAR fail lay in my ratios. I started by making a basic granola -- I toasted everything but the fruit, then tossed all the ingredients with melted butter (1 T.), vanilla extract (2 t.), and honey (1/2 c.).

Then, at the suggestion of the interwebs, to turn regular granola into bars, I pressed the mixture into a buttered 9" x 9" pyrex pan and baked at 325 F for about 25 minutes.

It had so much "bar" potential!
I suppose what I really needed was significantly more of the butter/honey mixture in relation to the dry ingredients. Although the recipe baked just fine, and although I refrigerated until bars were cool, everything just sort of fell apart...
...Yet didn't really stay in "bar" form.

Flavor-wise, I was pretty happy with the results. I forgot to put in any spices (I mean to use ginger, or maybe cinnamon), but the result was that the vanilla really burst through as the primary unifying flavor. The texture was super, inevitable when using this many diverse ingredients, although I particularly dug the figs. 

I really had been looking forward to making little bars, but hey -- I basically have awesome homemade cereal for a while. A bittersweet granola victory, indeed.

But not really. Pretty much just sweet.


***Look how much better the picture are in daylight!

Thursday
Mar172011

There Are Omelets I Remember

I don't have any excuses for this.
Well, three of them, at least. Also, how the heck do you spell "omelet"/"omelette"/"omelete"??? I'm going with "omelet," since I'm an American, dammit.

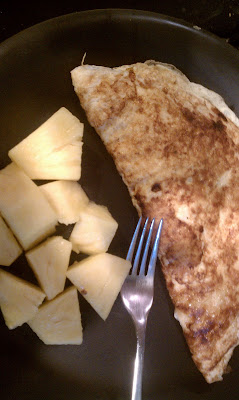
I've already discussed my recent predilection for omelet breakfasts. It's mostly a protein thing (25+ grams before 9 AM!), and I make 'em healthy by using mostly egg whites, Canadian bacon (very lean breakfast meat), and using onions, peppers, garlic, and dill.

The other day, though, I changed my omeletting process a little to great reviews from my taste buds. I started mixing a little cottage cheese into the eggs before starting to cook, which has made the dish fluffier and lighter, and cooked everything in less time by swirling uncooked egg under the cooked edges more aggressively. Really, very fluffy, almost delicate omelets going on all up in this business.

So, just to leap back into the blogging swing, here are some photos of the best omelets I've ever made!

IT'S ALL YELLOW.
And -- the best one EVER (this morning):
"The peppers are INSIDE the omelet..."

Monday
Feb212011

The (Ginger-Cognac) Truffle Shuffle!

The Stuff I used. Mostly!
Jen and I were pretty much on the same page vis-a-vis Valentine's Day. Granted, it helped that she was in town not for the "holiday" (I'll keep my feelings on contrived holidays to myself), but rather, primarily for a family celebration. But either way, we both independently chose to exchange gifts that reflected a gift of time and effort, not of shininess (or whatever). 

My gift to Jen was homemade chocolate truffles. I'd never made such a thing -- if you haven't noticed, I'm not hardcore into dessert-making. So I suppose that part of this gift was developing a skill she'll be able to take advantage of more than once. 

I kind of like this take on V-Day -- I think I've always tried to be a little subversive about the holiday by doing something simple, but in a way that reflects effort and thoughtfulness. 

The recipe I found called for:

-8 oz. of high quality bittersweet chocolate
-4 oz. of unsweetened chocolate
-1 (12 oz.) can of sweetened condensed milk
-8 T. unsalted butter
-Flavoring
-Coating

Clearly, it was in the last two ingredients that my creativity had room to shine. The recipe offered suggestions for "flavoring"; most involved a few tablespoons of a flavored liqueur and some essence of the corresponding flavor (i.e. 6 T. Grand Marnier and 1 T. orange zest). 

Never wanting to rely completely on a recipe, I thought and thought and thought. Finally, it hit me -- among my favorite liqueurs is Domaine de Canton, a ginger cognac delicacy (great in champagne or with a splash of whisky). Add to that a little fresh-grated ginger root, and I figured we had a solid start on our hands.

I started by coarsely chopping my chocolates. For the bittersweet, I'd opted for a solid Godiva; for the unsweetened, I used Baker's, which (usefully) comes packaged with each one ounce segment individually wrapped. 

YUM. 

Next, I went at the ginger, peeling the root then finely grating it. I wanted to prep this stuff first because, as anyone who's worked with melted chocolate knows, it can be fickle and require a lot of attention. Hah. Anyways, I wanted to have everything ready.

Once I was set to proceed, I threw the chocolates into a small saucepan over low heat with the butter (cut small) and the milk. The key here was to stir or whisk constantly to avoid burning the chocolate; I could have sped the process up by using a double boiler, but I don't own one and I was too lazy to MacGyver one up.
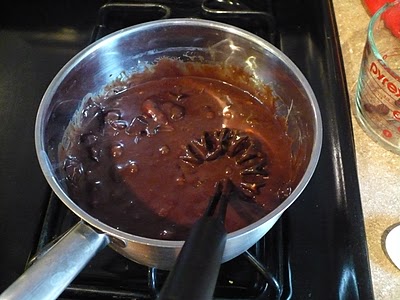
Still lumpy.
After my chocolates melted, in went the liqueur and the ginger. I transferred the mixture into a large bowl, and into the fridge everything went to set, theoretically for two hours.

Better!
For anyone trying to do this at home, this whole "getting cool" part did NOT take two hours, it took approximately forever. Since I was in a rush, I used the freezer for part of this process and the chocolate STILL wasn't where it was supposed to be. Whatevs, time, she was a wasting.

When it was time to start up again, I prepped my coatings. I had put together three options -- toasted walnut, unsweetened cocoa, and cinnamon. Only after I tasted the mixture did I realize it would be a crime to introduce a new flavor at this late stage. And it would be rookie. So, I whisked the cocoa with a half teaspoon of ground Chinese ginger, and put this into a largish cereal bowl.

Using a scoop, I began the awesome and messy process of molding about a tablespoon at a time of the chocolate into a ball, then tossing it with the coating. After about 30 minutes of this, I had FORTY TRUFFLES.

Oh, also: MESSY, right?
What the hell was I going to do with forty truffles? "Here, Jen: a satchel of truffles. A saddlebag of truffles. A... lot of truffles." How romantic, right?

Instead I gave her a pretty little bag of six (because truffles are the sort of thing that should be given in numbers to savor, not chow, right?). I scored brownie points by giving the rest to her family. POINTS.

Here is the ALMOST final product: 


I say "almost;" in a stroke of creativity I decided to roll them in my palms once more before wrapping, which had the effect of knocking off excess coating and smoothing the ovoid shape a tad. Sadly, I didn't photograph the product after this additional step. But trust me, they looked awesome.

Final thoughts: This was fun. And really not that expensive, which makes me feel dumb for buying 4 or five dollar truffles in the past. And there's room for endless creativity, which is pretty fun -- I might even say this would make a fun date activity. All around -- a keeper!
Monday
Feb142011

Pineapple-and-Ginger Infused Rum

WHIMSICAL. And delicious! And alcoholic!
I get to have a little Christmas morning every month: the day on which my Everyday Food magazine arrives. I suppose it's more a of Christmas eve, in that looking at the little magazine is more like viewing the potential treats, the meals yet to be made.

I know I talk this magazine up, but Everyday Food really does seem to hit a good balance, proffering numerous affordable and interest-piquing dishes and desserts without falling into the traps so many other food publications do (recipes with overly-esoteric or wicked pricey ingredients, for example).

Each month, they spend a little time highlighting fruits and/or vegetables which happen to be in season, and this month Everyday Food included several dishes and recipe ideas with my personal favorite: pineapple. I LOVE pineapple. I can, and have on numerous occasions, eaten a whole fruit in one sitting -- it's among my favorite treats and one I frequently use to quell my sweet tooth, with great success. Even after it starts to hurt a little, I just don't want to stop eating pineapple.

Now, I'll eventually get down to the pineapple black bean salsa, or the pineapple jerk pork chops, but I was a little TOO excited to see the recipe for pineapple-and-ginger infused rum. I've made infused spirits before, but always with vodka, and always using the zest of citrus fruits. This recipe constituted some new ground, and for every bit of enjoyment I'll wring from the liqueur, I'll gain in equal measure from the soon-to-be pineapple rum cake WITH RUM INFUSED PINEAPPLE.

So, win-win, right?

Right.

Although I often use recipes as a jump-off point for creativity, in this case I followed the recipe closely. The hardest part by far was securing a 2 Qt-ish glass jar, it not being canning season -- I eventually found a big jar of Mott's apple sauce, which I emptied into another container and washed. Then, in went thin, inch-long slices of fresh ginger root.


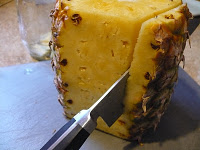
Then, After removing the pineapple's rind and frond, I cut the fruit into long strips and began to see how much I could fit into the jar (note: about 3/4).


Then, with the rum. The recipe called for decent stuff; I went for Bacardi silver. Sue me. I managed to fit a full fifth (.750 L) into the jar. Now, it's supposed to sit for a few weeks in the fridge with a daily shake-up, but I'm more than a little excited to give it a shot.
I'm still pretty entertained by the fronds atop the jar.

I'll keep you all posted.